0. Definition
Authenticated payment refers to a payment method that requests a credit card payment with the authentication key after receiving the authentication result for payment from the PG. It is the most popular payment method in Korea. When a payment is requested from the checkout page, the payment window of each PG is presented to the user. Once payment is authenticated in the the payment module of the credit card company selected by the user, payment request is processed based on the authentication result.
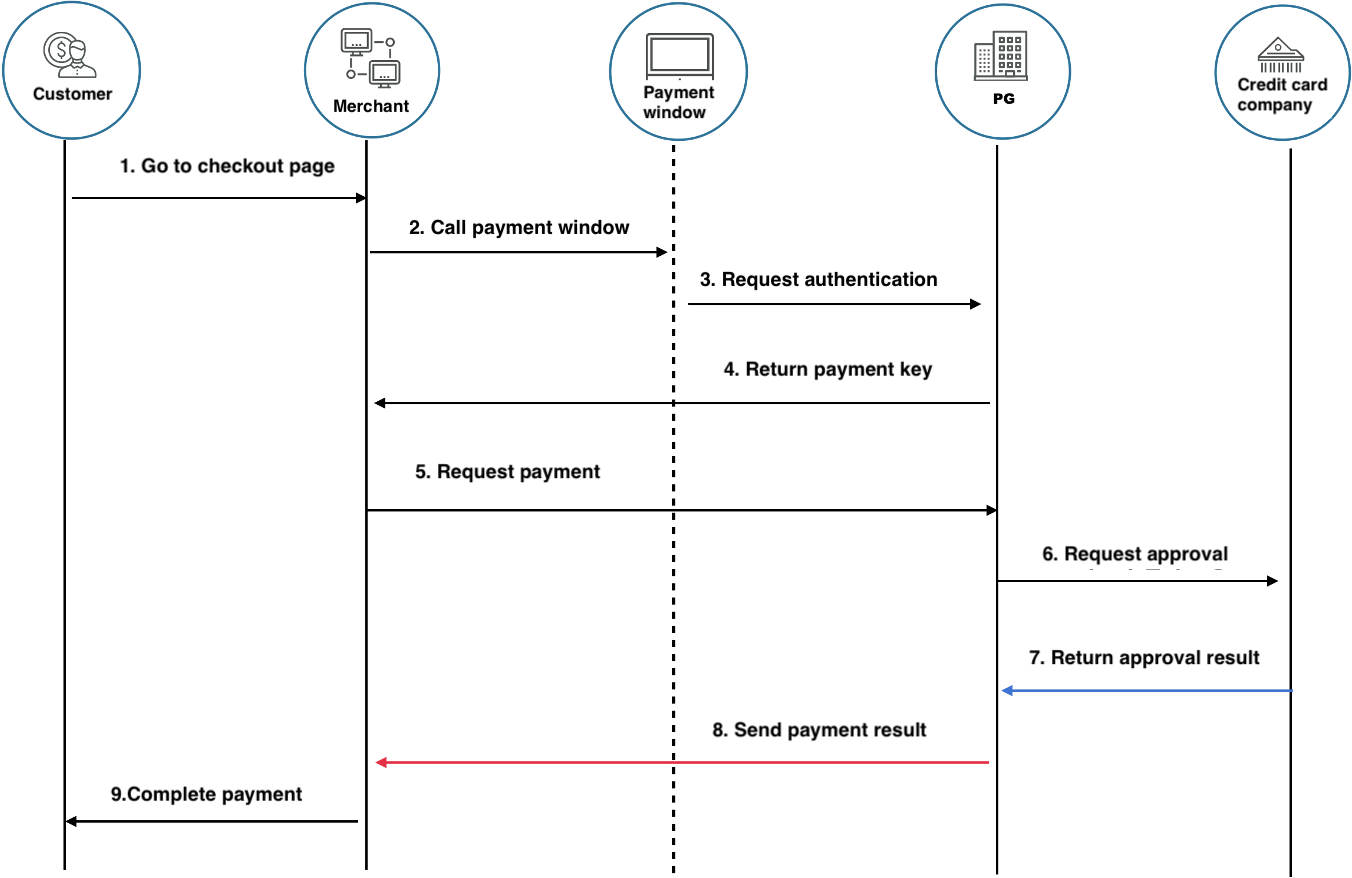
Communication for a live payment request is made directly between the merchant server and the PG server, and card information is not used in the payment request process.
Authenticated payment is traditionally categorized into the following two types based on the authentication method.
- ISP: authenticates pre-registered card information through a public key-based digital certificate
- MPI: authenticates card information by entering the card number, CVC, and secure click password.
Recently, most credit card companies support their own simple payment service that allows users to pre-register a credit card and use the 6-digit payment password to easily make a payment.
.png)
You can easily integrate authenticated payments through i'mport!
1. Add i'mport library
Add the JS library to your checkout page.
You must first install jQuery 1.0 or later version.
client-side<!-- jQuery -->
<script
  type="text/javascript"
  src="https://code.jquery.com/jquery-1.12.4.min.js"
></script>
<!-- iamport.payment.js -->
<script
  type="text/javascript"
  src="https://cdn.iamport.kr/js/iamport.payment-{SDK-latest version}.js"
></script>
2. Initialize IMP object
On the checkout page, initialize the IMP object using your Merchant ID.
Client-sideconst IMP = window.IMP; // Can be omitted
IMP.init("Merchant ID"); // Example: imp00000000
Client-sideconst IMP = window.IMP; // Can be omitted
IMP.init("{Merchant ID}"); // Example: imp00000000a
Be sure to initialize the IMP object only once.
3. Request payment
Once IMP object initialization is complete, you can open the payment window.
You can pass the parameters required to call the payment window in the first argument of the request_pay function.
IMP.request_pay(
  {
    pg: "kcp",
    pay_method: "card",
    merchant_uid: "ORD20180131-0000011", // Order ID
    name: "Norway swivel chair",
    amount: 64900, // Number
    buyer_email: "gildong@gmail.com",
    buyer_name: "Hong Gildong",
    buyer_tel: "010-4242-4242",
    buyer_addr: "Shinsa-dong, Gangnam-gu, Seoul",
    buyer_postcode: "01181",
  },
  function (rsp) {
    // callback
    if (rsp.success) {
      // Payment is successful
    } else {
      // Payment failed
    }
  },
);
export class RequestPay extends React.Component {
requestPay = () => {
IMP.request_pay(
{
// param
pg: "kcp",
pay_method: "card",
merchant_uid: "ORD20180131-0000011",
name: "Norway swivel chair",
amount: 64900,
buyer_email: "gildong@gmail.com",
buyer_name: "Hong Gildong",
buyer_tel: "010-4242-4242",
buyer_addr: "Shinsa-dong, Gangnam-gu, Seoul",
buyer_postcode: "01181",
},
(rsp) => {
// callback
if (rsp.success) {
// Payment is successful
} else {
// Payment failed
}
},
);
};
}export default {
methods: {
requestPay: function () {
IMP.request_pay(
{
// param
pg: "kcp",
pay_method: "card",
merchant_uid: "ORD20180131-0000011",
name: "Norway swivel chair",
amount: 64900,
buyer_email: "gildong@gmail.com",
buyer_name: "Hong Gildong",
buyer_tel: "010-4242-4242",
buyer_addr: "Shinsa-dong, Gangnam-gu, Seoul",
buyer_postcode: "01181",
},
(rsp) => {
// callback
if (rsp.success) {
// Payment is successful
} else {
// Payment failed
}
},
);
},
},
};Note - Creating an order ID (merchant_uid)
- The order number must always be assigned a unique value each time the payment window is requested.
- After the payment process is complete, the server uses the order ID to retrieve the order information for payment fraud check. Be sure to create a unique ID on the merchant server and store it in the DB.
The following is the above sample code with the Pay button added.
sample.html<!doctype html>
<html lang="en">
  <head>
    <!-- jQuery -->
    <script
      type="text/javascript"
      src="https://code.jquery.com/jquery-1.12.4.min.js"
    ></script>
    <!-- iamport.payment.js -->
    <script
      type="text/javascript"
      src="https://cdn.iamport.kr/js/iamport.payment-1.2.0.js"
    ></script>
    <script>
      var IMP = window.IMP;
      IMP.init("impXXXXXXXXX");

      function requestPay() {
        IMP.request_pay(
          {
            pg: "kcp",
            pay_method: "card",
            merchant_uid: "57008833-33004",
            name: "Carrots 10kg",
            amount: 1004,
            buyer_email: "Iamport@chai.finance",
            buyer_name: "iamport tech support",
            buyer_tel: "010-1234-5678",
            buyer_addr: "Samsung-dong, Gangnam-gu, Seoul",
            buyer_postcode: "123-456",
          },
          function (rsp) {
            // callback
            if (rsp.success) {
              console.log(rsp);
            } else {
              console.log(rsp);
            }
          },
        );
      }
    </script>
    <meta charset="UTF-8" />
    <title>Sample Payment</title>
  </head>
  <body>
    <button onclick="requestPay()">Pay</button>
    <!-- Pay button -->
  </body>
</html>
4-a. Process payment result (iframe)
When the payment process is completed successfully, you can receive the payment result depending on the payment window type as follows:
| iframe | Popup |
|---|---|
| callback function | m_redirect_url |
What is an iframe?
It is a nested browser that effectively embeds another HTML page into the current page. By using the iframe element, other pages can be loaded and inserted into a web page without any restrictions.
.png)
Most payments that are processed in the PC environment can receive payment results through the callback function, which is the second argument of the request_pay() function.
For PayPal payments, the payment window is loaded as a pop-up (new window) in a PC environment and you can also receive the payment result through m_redirect_url.
The following sample code processes the response to a payment request in a typical PC environment where the payment window is loaded as iframe.
client-sideIMP.request_pay(
  {
    /* ...Omitted... */
  },
  function (rsp) {
    // callback
    if (rsp.success) {
      // payment successful: payment accepted or virtual account issued
      // HTTP request with jQuery
      jQuery
        .ajax({
          url: "{Merchant endpoint that receives server's payment info}",
          method: "POST",
          headers: { "Content-Type": "application/json" },
          data: {
            imp_uid: rsp.imp_uid, // Payment ID
            merchant_uid: rsp.merchant_uid, // Order ID
          },
        })
        .done(function (data) {
          // Merchant server payment API call is successful
          console.log(data);
        });
    } else {
      alert("Payment failed. Error: " + rsp.error_msg);
    }
  },
);
client-sideIMP.request_pay(
  {
    /* ...Omitted... */
  },
  (rsp) => {
    // callback
    if (rsp.success) {
      // HTTP request with axios
      axios({
        url: "{Endpoint that receives server's payment info}",
        method: "post",
        headers: { "Content-Type": "application/json" },
        data: {
          imp_uid: rsp.imp_uid,
          merchant_uid: rsp.merchant_uid,
        },
      }).then((data) => {
        // Server payment API call is successful
        console.log(data);
      });
    } else {
      alert(`Payment failed. Error: ${rsp.error_msg}`);
    }
  },
);
Based on the the payment result (sucess/fail) in the response object (rsp) returned after the payment process is complete, add the post-payment processing logic in the callback function. When the payment is successful, add the logic to send the payment ID (imp_uid) and order ID (merchant_uid) to the server as shown above.
For information about the response parameter passed to the callback function, refer to rsp.
The final payment result logic processing must be handled stably by using a webhook. If you don't set up a webhook, you may fail to receive the payment result.
4-b. Process payment result (redirect)
The following sample code processes the response to a payment request in a typical mobile environment where the payment window is redirected to a new page to process the payment result.
client-sideIMP.request_pay(
  {
    /* ...Omitted... */
    m_redirect_url: "{redirect URL}",
  },
  /* callback */
); // callback is not called
client-sideIMP.request_pay(
  {
    /* ...Omitted... */
    m_redirect_url: "{redirect URL}",
  },
  /* callback */
); // callback is not called
If m_redirect_url is specified as the request_pay function parameter as above, the payment result is sent to the URL address in the form of a query string after payment is completed.
The following is an example of redirecting URL based on the query string.
curl https://myservice.com/payments/complete?imp_uid=unique_iamport_paymentID&merchant_uid=unique_merchant_orderID&imp_success=truecurl https://myservice.com/payments/complete?imp_uid=unique_iamport_paymentID&merchant_uid=unique_merchant_orderID&imp_success=false&error_code=error_code(none_defined_currently)&error_msg=error_message| Parameter | Description | Remarks |
|---|---|---|
| imp_uid | i'mport payment ID | Common |
| merchant_uid | Merchant order ID | Common |
| imp_success | Whether payment is successful | Common |
| error_code | Error code | Upon failure |
| error_msg | Error message | Upon failure |
If the payment window is redirected to a new page, you cannot receive the payment result via callback.
What does completion of the payment process mean?
The
payment process is completewhen:
Payment is successful (Status:
paid, imp_success:true)Payment fails (Status:
failed, imp_success:false)Payment window fails to open due to PG module setting error
User terminates the payment process by clicking the X or Cancel button
Payment is suspended due to invalid card information, limit exceeded, insufficient balance, etc.
Virtual account is issued (status:
ready, imp_success:true)
The final payment result logic processing must be handled stably by using a webhook. If you don't set up a webhook, you may fail to receive the payment result.
5. Verify payment information
Based on the payment information from the client, the server verifies the payment amount for fraud and saves the payment information in the database if needed. The following are the steps for verifying the payment information.
-
Server receives the i'mport payment ID (imp_uid) and order ID (merchant_uid)
-
Call the Get payment API to get the payment details.
-
Based on the response, compare the actual payment amount with the payment request amount (from merchant's database).
STEP 01 Server receives payment result
Example of handling a POST request to the merchant endpoint URL that receives the payment information
server-sideapp.use(bodyParser.json());
// "{Merchant endpoint that receives server's payment info}" POST request receiver
app.post("/payments/complete", async (req, res) => {
  try {
    // Get imp_uid, merchant_uid from req.body
    const { imp_uid, merchant_uid } = req.body;
  } catch (e) {
    res.status(400).send(e);
  }
});
STEP 02 Get payment details
Example of calling the Get payment API with the i'mport payment ID (imp_uid) to retrieve the payment info.
server-sideapp.use(bodyParser.json());
app.post("/payments/complete", async (req, res) => {
  try {
    // Get imp_uid, merchant_uid from req.body
    const { imp_uid, merchant_uid } = req.body;
    // Get access token
    const getToken = await axios({
      url: "https://api.iamport.kr/users/getToken",
      method: "post", // POST method
      headers: { "Content-Type": "application/json" },
      data: {
        imp_key: "imp_apikey", // REST API key
        imp_secret:
          "ekKoeW8RyKuT0zgaZsUtXXTLQ4AhPFW3ZGseDA6bkA5lamv9OqDMnxyeB9wqOsuO9W3Mx9YSJ4dTqJ3f", // REST API Secret
      },
    });
    const { access_token } = getToken.data.response; // access token
    // Get payment info from i'mport server using imp_uid
    const getPaymentData = await axios({
      // Pass imp_uid
      url: `https://api.iamport.kr/payments/${imp_uid}`,
      // GET method
      method: "get",
      // Add access toke to Authorization header
      headers: { Authorization: access_token },
    });
    const paymentData = getPaymentData.data.response; // Payment info
  } catch (e) {
    res.status(400).send(e);
  }
});
STEP 03 Verify payment information
Why fraud detection is necessary
Since the payment request is made on the client side, a payment request can be forged or falsified by manipulating the client script. Therefore, you must compare the original requested amount with the actual processed amount after the payment process is complete.
For example, when paying for a product that costs 100,000 won, an attacker can manipulate the client script to change the
amountproperty to a value lower than the actual amount.Since you cannot prevent script manipulation on the client, you must check for fraud on the server after the payment is processed.
Example of comparing the actual payment amount and the payment request amount, performing fraud check on the payment amount, and saving the data in the DB.
server-sideapp.use(bodyParser.json());
app.post("/payments/complete", async (req, res) => {
  try {
    // Get imp_uid, merchant_uid from req.body
    const { imp_uid, merchant_uid } = req.body;
    // Get access token
    /* ...Omitted... */
    // Get payment info from iamport server using imp_uid
    /* ...Omitted... */
    const paymentData = getPaymentData.data.response; // Payment info
    // Get the requested payment amount from the DB
    const order = await Orders.findById(paymentData.merchant_uid);
    const amountToBePaid = order.amount; // Requested payment amount
    // Verify payment
    const { amount, status } = paymentData;
    // If amount matches. Processed amount === Requested amount
    if (amount === amountToBePaid) {
      await Orders.findByIdAndUpdate(merchant_uid, { $set: paymentData }); // Save payment info to DB
      switch (status) {
        case "ready": // Issue virtual account
          // Save virtual account info in DB
          const { vbank_num, vbank_date, vbank_name } = paymentData;
          await Users.findByIdAndUpdate("/* customer id */", {
            $set: { vbank_num, vbank_date, vbank_name },
          });
          // Send virtual account issuance text message
          SMS.send({
            text: `Virtual account issued successfully. Account info ${vbank_num} ${vbank_date} ${vbank_name}`,
          });
          res.send({
            status: "vbankIssued",
            message: "Virtual account issued successfully",
          });
          break;
        case "paid": // Payment complete
          res.send({
            status: "success",
            message: "General payment successful",
          });
          break;
      }
    } else {
      // Amount mismatch. Forged/falsified payment.
      throw {
        status: "forgery",
        message: "Forged/falsified payment attempted",
      };
    }
  } catch (e) {
    res.status(400).send(e);
  }
});
The original requested amount is queried from the database with the merchant_uid, and the
actual processed amount is retrieved from the i'mport server with the imp_uid. The two
values are compared to verify that they match. If the verification is successful,
the payment information is saved in the database and a response is returned based on the payment
status (status). Otherwise, an error message is returned.
The payment result must be processed on the database based on the data received through a webhook for stable processing without any missing result data.
6. Complete payment
In a typical PC-environment payment processed using an iframe, the payment response can be received via a callback function. When the result processing is completed on the merchant server, the result message based on the success of the payment is returned as shown in the following example.
client-sideIMP.request_pay(
  {
    /* ...Omitted... */
  },
  function (rsp) {
    // callback
    if (rsp.success) {
      // payment successful: payment accepted or virtual account issued
      // jQuery HTTP request
      jQuery
        .ajax({
          /* ...Omitted... */
        })
        .done(function (data) {
          // response processing
          switch (data.status) {
            case "vbankIssued":
              // Virtual account issued
              break;
            case "success":
              // Payment successful
              break;
          }
        });
    } else {
      alert("Payment failed. Error message: " + rsp.error_msg);
    }
  },
);
client-sideIMP.request_pay(
  {
    /* ...Omitted... */
  },
  (rsp) => {
    // callback
    if (rsp.success) {
      // payment successful: payment accepted or virtual account issued
      // axios HTTP request
      axios({
        /* ...Omitted... */
      }).then((data) => {
        // Response processing
        switch (data.status) {
          case "vbankIssued":
            // Virtual account issued
            break;
          case "success":
            // Payment successful

            break;
        }
      });
    } else {
      alert(`Payment failed. Error message: ${rsp.error_msg}`);
    }
  },
);
In a typical mobile environment payment processed by redirecting to a new page, process the payment complete message from the merchant endpoint URL set in the m_redirect_url parameter.
error_msg and error_code definitions
These parameters are returned as a response when the payment fails and they contains the same values returned from the PG without additional processing. Note that we don't yet provide definitions for the error codes and error messages that have accumulated in our system.